This post is a multi-part post, the 1st part covers the 2 different models that are widely deployed, initial configuration for the BNG with dynamic templates/service policy maps. The 2nd part will cover the database setup and authorizing a customer onto the network to reach the relevant retail ISP services based on the shared database.
We will first begin with the basic setup and configuration of the most recent FreeRADIUS package running on Ubuntu 22.04. Test authorization for a single user and then start looking a very basic wholesale API to let the retail ISPs add their own customer data into the shared database.
apt update
apt upgrade
Easy way to install FreeRADIUS (not up to date) with SQL modules
apt install freeradius freeradius-mysql
This installs version 3.0.26, you should install the latest version in production however this is what we will use after the next section.
Building FreeRADIUS from source
Install the dependencies before installing FreeRADIUS:
apt install build-essential
apt install libssl-dev
apt install libtalloc-dev
apt install libhiredis-dev
Troubleshooting the build process:
- If you come across
configure:4096: error: no acceptable C compiler found in $PATHthen you need to runapt install build-essential. - If you come across
configure: WARNING: talloc library not found. Use --with-talloc-lib-dir=<path>.then you need to runapt install libtalloc-dev. - If you come across
configure: error: failed linking to libcrypto. Use --with-openssl-lib-dir=<path>, or --with-openssl=no (builds without OpenSSL)then you need to runapt install libssl-dev. - If you come across
configure: WARNING: FAILURE: rlm_rediswho requires: hiredis.h libhiredis.then you need to runapt install libhiredis-dev.
Let’s download the latest tar for FreeRADIUS which is currently 3.2.0 writing this post:
wget ftp://ftp.freeradius.org/pub/freeradius/freeradius-server-3.2.0.tar.gz
tar -zxvf freeradius-server-3.2.0.tar.gz
cd freeradius-server-3.2.0
The install instructions are found in INSTALL.rst however we will simply install the default configuration and then tweak the configuration after installing MariaDB.
./configure
make
make install
The default directory when building from source for the configuration files are located in: /usr/local/etc/raddb, however because we used the easy method via our package manager, our directory we will be working in is /etc/freeradius/3.0/, replace this directory in any command if you have built it from source. Lastly, we will just ensure the service is enabled.
systemctl enable freeradius
Installing MariaDB for the database
This isn’t a best practice on how to configure your database, we will be installing the database on the same node as FreeRADIUS to keep the lab simple but ideally you would have some kind of redundancy with replication between a node of MariaDB servers and it is recommended to run something like MaxScale that can proxy your SQL statements and handle the authentication and HA (also scalability) for your database backend.
apt install mariadb-server
mysql_secure_installation
Run through the initial configuration and create a password for the root user and ensure that you disable root login remotely since we will be creating our own database user for FreeRADIUS. Now let’s ensure the service is enabled.
systemctl enable mariadb
If your radius server is not on the same host as the database, you will need to change the bind-address in /etc/mysql/mariadb.conf.d/50-server.cnf to allow MariaDB to listen on an IP address and also create the user with access from the source IP instead of localhost within the database itself. We don’t need to change any settings related to the mariadb server at this point in this lab configuration so lets move onto creating the database + user and then importing the radius schema into our database.
mariadb -u root -p
MariaDB [(none)]> CREATE DATABASE radius;
MariaDB [(none)]> CREATE USER 'freeradius'@'localhost' IDENTIFIED BY 'freeradius123';
MariaDB [(none)]> GRANT ALL PRIVILEGES ON radius.* TO 'freeradius'@'localhost';
MariaDB [(none)]> FLUSH PRIVILEGES;
MariaDB [(none)]> SHOW databases;
+--------------------+
| Database           |
+--------------------+
| information_schema |
| mysql              |
| performance_schema |
| radius             |
| sys                |
+--------------------+
5 rows in set (0.000 sec)

MariaDB [(none)]> USE radius;
Database changed
MariaDB [radius]> Ctrl-C -- exit!
Aborted
root@wholesale-radius-1:/etc/freeradius/3.0# ^C
Let’s import the SQL schema into our radius database:
mariadb -u root -p radius < /etc/freeradius/3.0/mods-config/sql/main/mysql/schema.sql
mariadb -u root -p
MariaDB [(none)]> USE radius;
Database changed
MariaDB [radius]> SHOW tables;
+------------------+
| Tables_in_radius |
+------------------+
| nas              |
| radacct          |
| radcheck         |
| radgroupcheck    |
| radgroupreply    |
| radpostauth      |
| radreply         |
| radusergroup     |
+------------------+
8 rows in set (0.000 sec)
FreeRADIUS configuration for sql module
To enable the sql module, we create a symbolic link and then need to configure the sql module and then finally make FreeRADIUS use the sql module during the relevant steps of the RADIUS process (authorize section).
cd /etc/freeradius/3.0/mods-enabled
ln -s ../mods-available/sql sql
I typically copy the sql module as a backup/default config and then delete all the hundreds of comments to make the file less bulky, this is the configuration I am going for in the lab, note that although the dialect is using mysql, we are still using a MariaDB server.
sql {
        dialect = "mysql"
        driver = "rlm_sql_${dialect}"

        server = "localhost"
        port = 3306
        login = "freeradius"
        password = "freeradius123"
        radius_db = "radius"
        acct_table1 = "radacct"
        acct_table2 = "radacct"
        postauth_table = "radpostauth"
        authcheck_table = "radcheck"
        groupcheck_table = "radgroupcheck"
        authreply_table = "radreply"
        groupreply_table = "radgroupreply"
        usergroup_table = "radusergroup"
        read_groups = yes
        delete_stale_sessions = yes
        pool {
                start = ${thread[pool].start_servers}
                min = ${thread[pool].min_spare_servers}
                max = ${thread[pool].max_servers}
                spare = ${thread[pool].max_spare_servers}
                uses = 0
                retry_delay = 30
                lifetime = 0
                idle_timeout = 60
        }
        read_clients = no
        client_table = "nas"
        group_attribute = "SQL-Group"
        $INCLUDE ${modconfdir}/${.:name}/main/${dialect}/queries.conf
}
You can set read_clients = yes if you want to store the nasclients inside the database however we won’t do that. Let’s now change our authorize module to use the sql module.
vim /etc/freeradius/3.0/sites-available/default
Find the authorize module, here it is line 285, typically you would remove modules that will not be used such as chap, mschap, digest, eap, etc… but this isn’t a best practice config guide. The sql module is disabled around line 428 and shows -sql. Change this to sql, here is the minimal configuration for this module in this lab:
authorize {
        filter_username
        preprocess
        suffix
        files
        sql
        pap
}
The accounting module around line 648 and post-auth module around line 733 can also be changed to add accounting records to the database. Here is also the minimal configuration for this module used in this lab:
accounting {
        # detail module is left to log accounting records to disk
        detail
        sql
}
Finally, here is the minimal configuration used in the lab for the post-auth module:
post-auth {
        sql
        Post-Auth-Type REJECT {
                sql
                attr_filter.access_reject
        }
}
We can test this configuration by running freeradius -X. This command allows us to run FreeRADIUS in debug mode and is very useful with the SQL module because we will see the RADIUS access-requests come in and see the database SELECT/INSERT statements that are sent to our MariaDB server. At this point, we are ready to add our BNG as a client and then begin to add users into our database. I’ve actually built an open source API to run on top of a FreeRADIUS server that allows us to manage the database via API calls so we will install that to test customer authorization. Let’s add the BNG as a client and then we’ll install this API to manage the database.
/etc/freeradius/3.0/clients.conf
client wholesale-bng-1 {
        ipaddr          = 10.4.20.94
        secret          = ciscodisco
        shortname       = wholesale-bng-1
        nastype         = cisco
}
BNG configuration:
radius-server host 10.4.20.85 auth-port 1812 acct-port 1813
 key 7 05080F1C22434A000A0618

aaa group server radius WHOLESALE_RADIUS
 server 10.4.20.85 auth-port 1812 acct-port 1813

aaa accounting subscriber SHARED_RADIUS group WHOLESALE_RADIUS
aaa authorization subscriber SHARED_RADIUS group WHOLESALE_RADIUS
aaa authentication subscriber SHARED_RADIUS group WHOLESALE_RADIUS
RADIUS API - The fun part
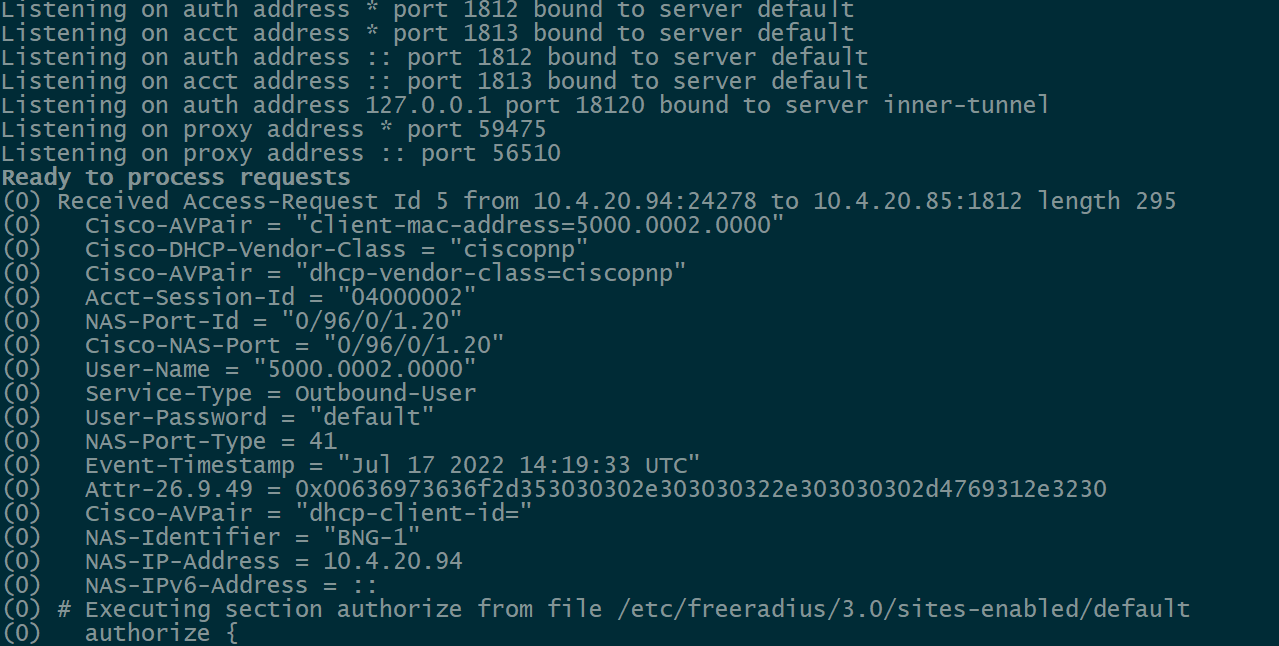
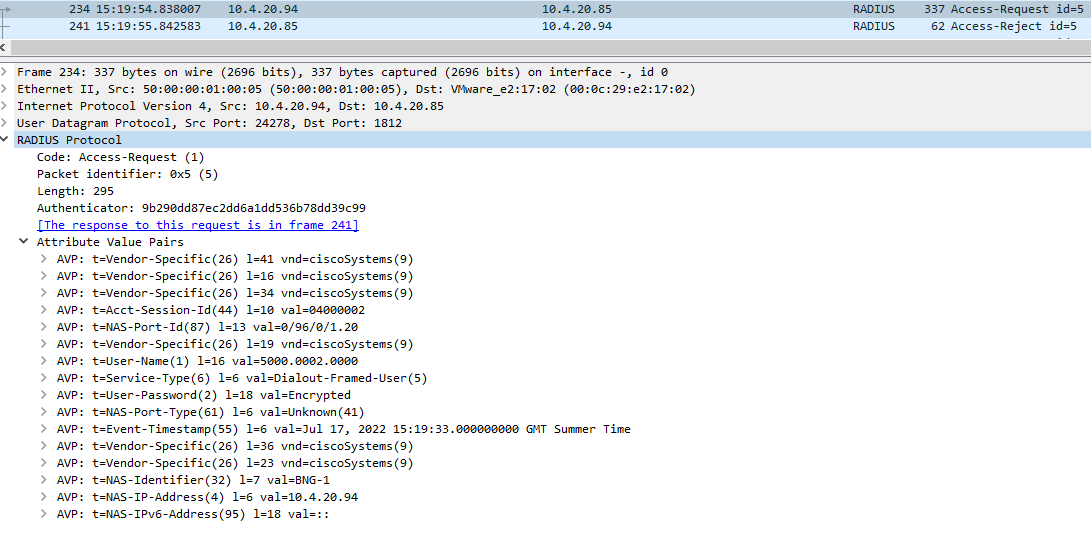
By now, our retailer ISP #2 has a subscriber asking for DHCP but our server is currently rejecting the access-request sent by the BNG because the user does not exist in the database. Below is an example of running freeradius -X which displays information about the RADIUS access-request packet:
I’m going to install Docker using this guide however if you want to add users into the database directly, you can still follow along and insert each attribute manually using the same attribute/op/values sent through this API I will run as a docker container on the same FreeRADIUS server. NOTE that I have also installed docker-compose to run this project.
- Clone the freeradius-api project using
git clone https://github.com/BSpendlove/freeradius-api.git cd freeradius-api- Copy the example ENV
cp .env-example .env - Fill out the env file with the relevant details, this lab will configure the ENV like this:
API_TOKEN_KEY=x-api-token
API_TOKEN=1689f6d6-917a-4db5-b344-34d5e3b6407a
SQLALCHEMY_DATABASE_URI="mysql+pymysql://freeradius:freeradius123@10.4.20.85:3306/radius?charset=utf8mb4"
- Change MariaDB configuration to listen on 0.0.0.0 and for this lab we will just allow the
freeradiususer to be accessed via a wildcard host. This isn’t recommended to run in production and again, I’m trying to get this lab up as fast as possible to show you the underlying concept.
vim /etc/mysql/mariadb.conf.d/50-server.cnf

bind-address = 0.0.0.0

sudo systemctl restart mariadb
brandon@wholesale-radius-1:~/freeradius-api$ mariadb -u root -p
Enter password:
MariaDB [(none)]> GRANT ALL ON radius.* to 'freeradius'@'%' IDENTIFIED BY 'freeradius123' WITH GRANT OPTION;
MariaDB [(none)]> FLUSH PRIVILEGES;
MariaDB [(none)]> Ctrl-C -- exit!
Aborted
docker compose up -d --buildwithin ourfreeradius-apidirectory.
if you have any issues running step 6, ensure your MariaDB configuration is configured with the bind-address of 0.0.0.0 and that the firewall allows TCP/3306. Also ensure that your user has the correct permissions and is allowed to be identified by the source IP of your container (or % in our case for the lab)
- Create the RADIUS group for ISP2 to return some radius attributes
curl --location --request POST 'http://10.4.20.85:8083/api/v1/radius/groups/' \
--header 'x-api-token: 1689f6d6-917a-4db5-b344-34d5e3b6407a' \
--header 'Content-Type: text/plain' \
--data-raw '{
    "groupname": "ISP2_1000",
    "check_attributes": [
        {
            "attribute": "Cleartext-Password",
            "op": ":=",
            "value": "default"
        }
    ],
    "reply_attributes": [
        {
            "attribute": "Cisco-AVPair",
            "op": "+=",
            "value": "sub-qos-policy-in=PM_1000"
        },
        {
            "attribute": "Cisco-AVPair",
            "op": "+=",
            "value": "sub-qos-policy-out=PM_1000"
        }
    ]
}'
- Create a user for your ISP retailer based on the MAC address (or any other attribute if you have gone the extra mile to implement DHCP option-82 in this lab or are able to insert it on a linux client). Note that a check_attribute needs to be assigned to the user otherwise FreeRADIUS will not be able to perform further lookups for that user and get the relevant attributes that the user is assigned to.
curl --location --request POST 'http://10.4.20.85:8083/api/v1/radius/users/' \
--header 'x-api-token: 1689f6d6-917a-4db5-b344-34d5e3b6407a' \
--header 'Content-Type: text/plain' \
--data-raw '{
    "username": "5000.0002.0000",
    "groups": [
        {
            "groupname": "ISP2_1000",
            "priority": 100
        }
    ],
    "check_attributes": [
        {
            "attribute": "Cleartext-Password",
            "op": ":=",
            "value": "default"
        }
    ]
}'
- Since the configuration in part 1 allowed subscribers to still be authenticated when the RADIUS server was unreachable, I will clear subscribers (
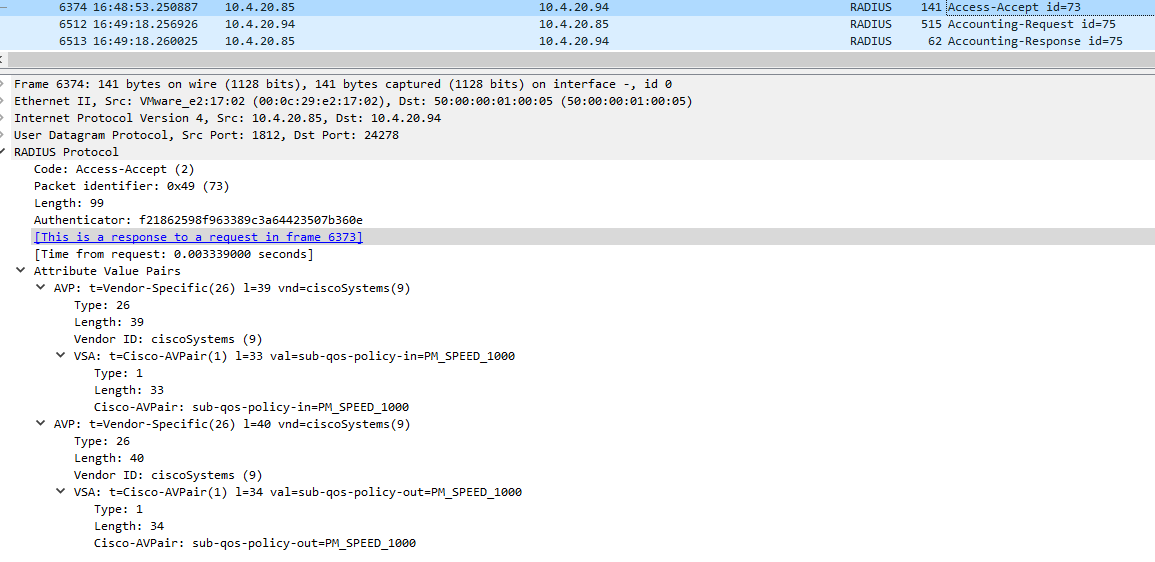
clear subscriber session all) on the BNG and rerun FreeRADIUS usingfreeradius -Xand perform a packet capture so we can look at the access-accept which it should return when this user is found in the shared database.
Access-Request and Access-Accept in FreeRADIUS debug output
(1) Received Access-Request Id 51 from 10.4.20.94:24278 to 10.4.20.85:1812 length 295
(1)   Cisco-AVPair = "client-mac-address=5000.0002.0000"
(1)   Cisco-DHCP-Vendor-Class = "ciscopnp"
(1)   Cisco-AVPair = "dhcp-vendor-class=ciscopnp"
(1)   Acct-Session-Id = "04000013"
(1)   NAS-Port-Id = "0/96/0/1.20"
(1)   Cisco-NAS-Port = "0/96/0/1.20"
(1)   User-Name = "5000.0002.0000"
(1)   Service-Type = Outbound-User
(1)   User-Password = "default"
(1)   NAS-Port-Type = 41
(1)   Event-Timestamp = "Jul 17 2022 15:42:47 UTC"
(1)   Attr-26.9.49 = 0x00636973636f2d353030302e303030322e303030302d4769312e3230
(1)   Cisco-AVPair = "dhcp-client-id="
(1)   NAS-Identifier = "BNG-1"
(1)   NAS-IP-Address = 10.4.20.94
(1)   NAS-IPv6-Address = ::
(1) # Executing section authorize from file /etc/freeradius/3.0/sites-enabled/default
<omitted-output>
(2) sql: SQL-User-Name set to '5000.0002.0000'
(2) sql:    --> INSERT INTO radpostauth (username, pass, reply, authdate ) VALUES ( '5000.0002.0000', 'default', 'Access-Accept', '2022-07-17 15:43:36.132710' )
(2) sql: Executing query: INSERT INTO radpostauth (username, pass, reply, authdate ) VALUES ( '5000.0002.0000', 'default', 'Access-Accept', '2022-07-17 15:43:36.132710' )
(2) sql: SQL query returned: success
(2) sql: 1 record(s) updated
rlm_sql (sql): Released connection (0)
(2)     [sql] = ok
(2)   } # post-auth = ok
(2) Sent Access-Accept Id 53 from 10.4.20.85:1812 to 10.4.20.94:24278 length 87
(2)   Cisco-AVPair = "sub-qos-policy-in=PM_SPEED_1000"
(2)   Cisco-AVPair = "sub-qos-policy-out=PM_SPEED_1000"
(2) Finished request
Wireshark Access-Accept packet sent back to BNG
RP/0/RP0/CPU0:BNG-1#show subscriber session all detail internal
Sun Jul 17 15:54:47.453 UTC
Interface:                GigabitEthernet0/0/0/0.20.ip12
Circuit ID:               Unknown
Remote ID:                Unknown
Type:                     IP: DHCP-trigger
IPv4 State:               Up, Sun Jul 17 15:48:56 2022
IPv4 Address:             10.20.0.14, VRF: ISP2
IPv4 Up helpers:          0x00000040 {IPSUB}
IPv4 Up requestors:       0x00000040 {IPSUB}
Mac Address:              5000.0002.0000
Account-Session Id:       0400001a
Nas-Port:                 Unknown
User name:                5000.0002.0000
Formatted User name:      5000.0002.0000
Client User name:         unknown
Outer VLAN ID:            20
Inner VLAN ID:            1
Subscriber Label:         0x04000019
Created:                  Sun Jul 17 15:48:31 2022
State:                    Activated, Sun Jul 17 15:48:56 2022

Authentication:           unauthenticated
Authorization:            authorized
Ifhandle:                 0x010000a0
Session History ID:       12
Access-interface:         GigabitEthernet0/0/0/0.20
iEdge Oper Flags:         0x00000006
SRG Flags:                0x00000000(N)
SRG Group ID:             0
Prepaid State:            (Disabled)
Policy Executed:

event Session-Start match-first [at 1658072911]
 class type control subscriber CM_IPOE_DHCPV4V6 do-until-failure [Succeeded]
 1 authorize aaa list SHARED_RADIUS [cerr: Success][aaa: Success]
 2 activate dynamic-template DT_IPOE_ISP2 [cerr: Success][aaa: Success]
Session Accounting:
  Acct-Session-Id:          0400001a         <------ Unique Accounting Session ID
  Method-list:              SHARED_RADIUS
  Accounting started:       Sun Jul 17 15:48:56 2022
  Interim accounting:       Off
    Last update sent:       Never
    Updates sent:           0
    Updates accepted:       0
    Updates rejected:       0
    Update send failures:   0
Last COA request received: unavailable
User Profile received from AAA:       <---- RADIUS Attribute pairs returned via FreeRADIUS database
 Attribute List: 0x562a9dfa53e8
1:  sub-qos-policy-in len= 13  value= PM_SPEED_1000
2:  sub-qos-policy-out len= 13  value= PM_SPEED_1000
Services:
  Name        : DT_IPOE_ISP2           <--- Our dynamic template we created in PART #1, if we didn't have a template that assigns our VRF for ISP2, we would need to also return that via the AVPairs stored in the FreeRADIUS database, hence why having a dynamic template per retail ISP is probably the best idea

  Service-ID  : 0x4000004
  Type        : Template
  Status      : Applied
[Event History]
   Jul 17 15:48:56.448 Service status update [many]
-------------------------
[Event History]
   Jul 17 15:48:31.616 IPv4 Start
   Jul 17 15:48:31.616 SUBDB session create
   Jul 17 15:48:31.616 Authorization req
   Jul 17 15:48:51.840 Authorization res
   Jul 17 15:48:51.840 SUBDB produce done Start
   Jul 17 15:48:52.864 IPv4 Address-Add
   Jul 17 15:48:56.448 SUBDB produce done
   Jul 17 15:48:56.448 Session Update [many]
   Jul 17 15:48:56.448 Session Up
   Jul 17 15:48:56.448 IPv4 Up
   Jul 17 15:48:56.448 Account Start req
All of the accounting data and post-auth records are exposed via the freeradius-api we are running in a container, for example:
curl --location --request GET 'http://10.4.20.85:8083/api/v1/radius/radacct/5000.0002.0000' \
--header 'x-api-token: 1689f6d6-917a-4db5-b344-34d5e3b6407a'
[
    {
        "radacctid": 9,
        "acctsessionid": "0400001a",
        "acctuniqueid": "cee410e8a876eaa009df1971106e836b",
        "username": "5000.0002.0000",
        "realm": "",
        "nasipaddress": "10.4.20.94",
        "nasportid": "0/96/0/1.20",
        "nasporttype": "41",
        "acctstarttime": "2022-07-17T15:48:56",
        "acctupdatetime": "2022-07-17T15:48:56",
        "acctstoptime": null,
        "acctinterval": null,
        "acctsessiontime": 0,
        "acctauthentic": "",
        "connectinfo_start": "",
        "connectinfo_stop": "",
        "acctinputoctets": 0,
        "acctoutputoctets": 0,
        "calledstationid": "",
        "callingstationid": "",
        "acctterminatecause": "",
        "servicetype": "",
        "framedprotocol": "",
        "framedipaddress": "10.20.0.14",
        "framedipv6address": "",
        "framedipv6prefix": "",
        "framedinterfaceid": "",
        "delegatedipv6prefix": "",
        "id": null
    }
]
Now that we have a functional database running with FreeRADIUS authorizing our retail ISP #2 users, we will explore a “wholesale” like API in the next part of this blog and then build a DHCP server to proxy any DHCP requests for retail ISP #1. Each retail ISP will also be allowed to add new users into the shared radius database and also amend existing user data such as check/reply attributes and create their own groups.


